in this blog, you will see how to add tracking in WordPress Gravity Form via Google Tag Manager (GTM)
Gravity Form Tracking
We can track gravity form by using google analytics event tracking and conversion tracking code in 2 different Ways.
- By using wp-admin.
- By Using Tag Manager.
Here we will see both ways. It is entirely up to you, whichever options do you like you can go with that.

Gravity form Event Tracking by using wp-admin:
Steps to add Tracking Code using wp-admin:
- Login to wp-admin.
- Click on Forms(in left menu)
- Click on respective form where you want to add Tracking Code.
- Click on Confirmation(setting->confirmation).
- Click on TEXT option (Right-top of confirmation message box).
- Add your event tracking or conversion tracking pixel code after message.
- Check the checkbox of ‘Disable auto formatting‘ .
- Click on Save Confirmation Button.
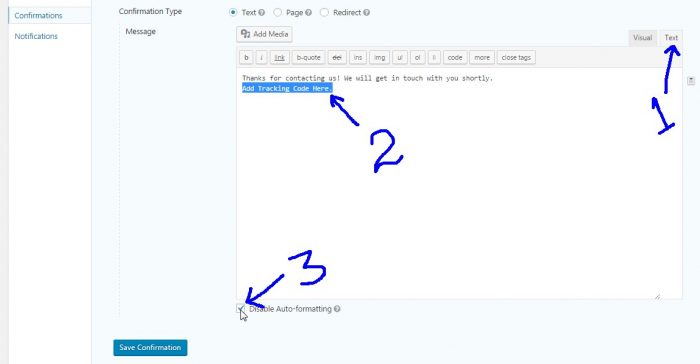
Steps to add Tracking Code using Tag Manager (GTM):
By using Google Tag manager you can add any type of HTML code on your website without editing main source code of your webpage of your website. Only you have to add GTM Container code on your website.
I know you will be amazed by GTM because of it’s extensive feature. but here we are not going to discuss on GTM features/options. We will focus on how to add Tracking code on Gravity form using GTM.
There are 2 more ways to add tracking code by GTM.
- Add tracking code on default GTM form submit event (i.e gtm.formSubmit listener):
By using this you can easily add your tracking code , just you have to enable some options in variables and create some Tags and triggers. But there is some problem with this, that it will track each form submission whether it is successful form submission or not.
That is why I would suggest to go with Custom HTML code. - Add tracking code by using Custom HTML Code:
Follow the below steps to add tracking code by using custom HTML code, This will help you to track successful form submission.
Steps to add tracking code by using custom code in GTM:
1) Create following new custom HTML tag, to push Gravity form states.
Tag Name: Gravity Form Custom Code
Configure Tag: Custom HTML Tag
Trigger on : DOM Ready
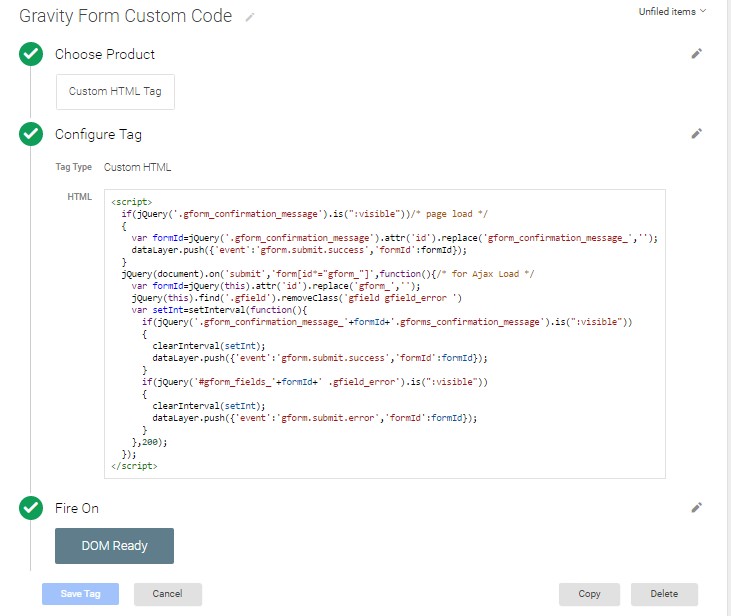
Custom Code:
<script>
  if(jQuery('.gform_confirmation_message').is(":visible"))/* page load */
  {
    var formId=jQuery('.gform_confirmation_message').attr('id').replace('gform_confirmation_message_','');
    dataLayer.push({'event':'gform.submit.success','formId':formId});
  }
  jQuery(document).on('submit','form[id*="gform_"]',function(){/* for Ajax Load */
  clearInterval(window.gsetInt);
    var formId=jQuery(this).attr('id').replace('gform_','');
    jQuery(this).find('.gfield').removeClass('gfield gfield_error ')
    window.gsetInt=setInterval(function(){
      if(jQuery('.gform_confirmation_message_'+formId+'.gforms_confirmation_message,.gform_confirmation_message_'+formId+'.gform_confirmation_message').is(":visible"))
      {
        clearInterval(window.gsetInt);
        dataLayer.push({'event':'gform.submit.success','formId':formId});
      }
      if(jQuery('#gform_fields_'+formId+' .gfield_error').is(":visible"))
      {
        clearInterval(window.gsetInt);
        dataLayer.push({'event':'gform.submit.error','formId':formId});
      }
    },200);
  });
</script>
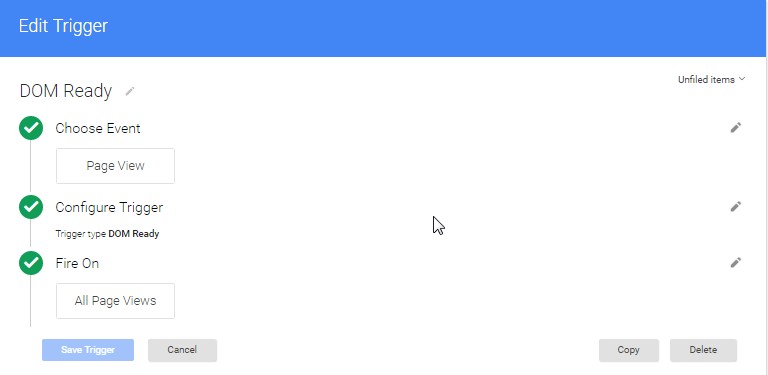
2) Create Trigger:
Trigger Name: DOM Ready
Choose Event: Page View
Trigger Type: DOM Ready
Fire On: All Pages
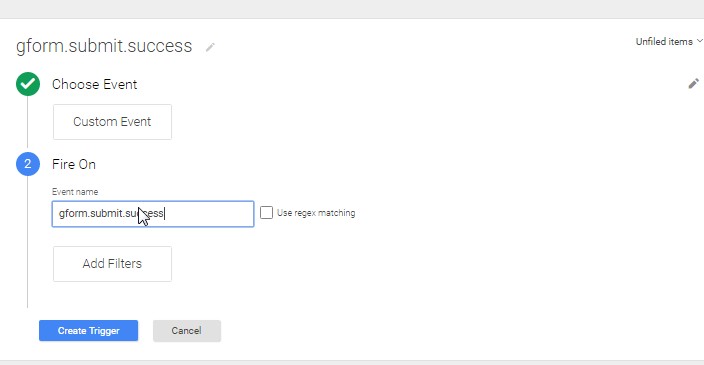
3) Create Trigger For Success Form Submission:
Tigger Name: gform.submit.success
Event Name: gform.submit.success
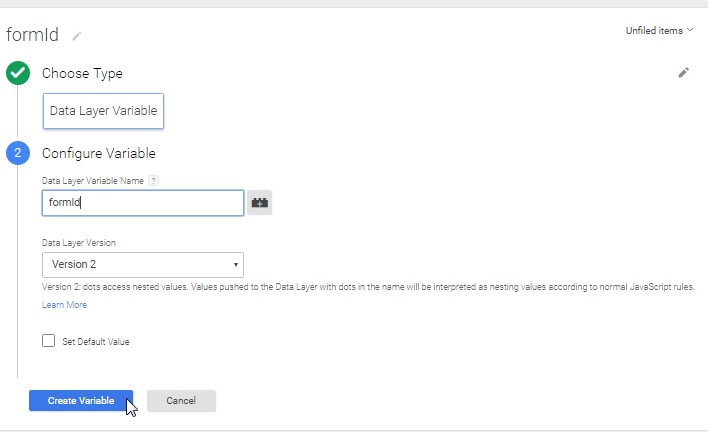
4) Create Variable to get form ID:
Variable Name: formId
Choose Type: Data Layer Variable
Data Layer Variable Name: formId
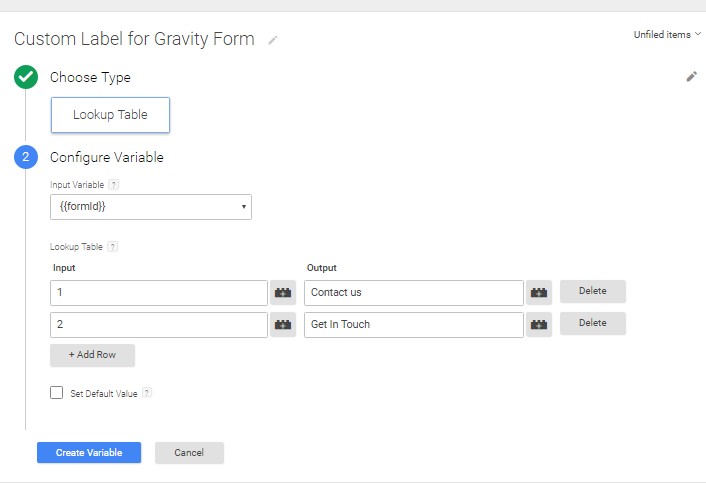
5) Create Lookup table variable to get Custom Label for Gravity form
Variable Name: Custom Label for Gravity Form
Choose Type: Lookup Table
Input Variable: {{formId}}
Lookup Table: As per Below Image
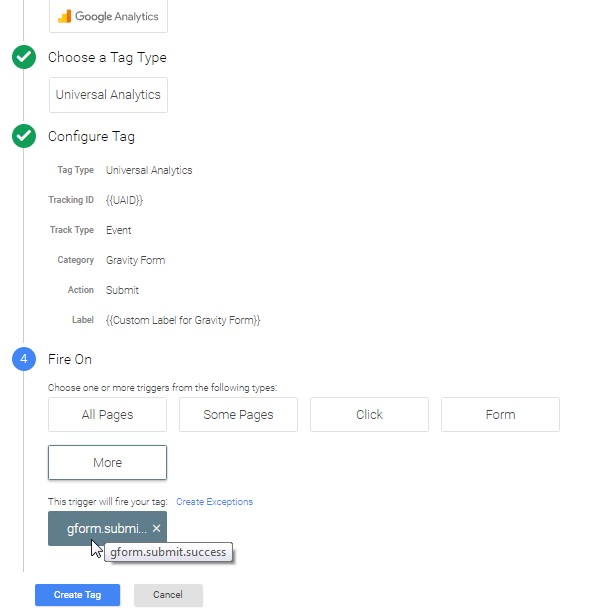
6) Create Event Tracking Tag For Gravity Form
Tag Name: Event Tracking Tag For Gravity Form
Trigger on: gform.submit.success
Label variable: {{Custom Label for Gravity Form}}
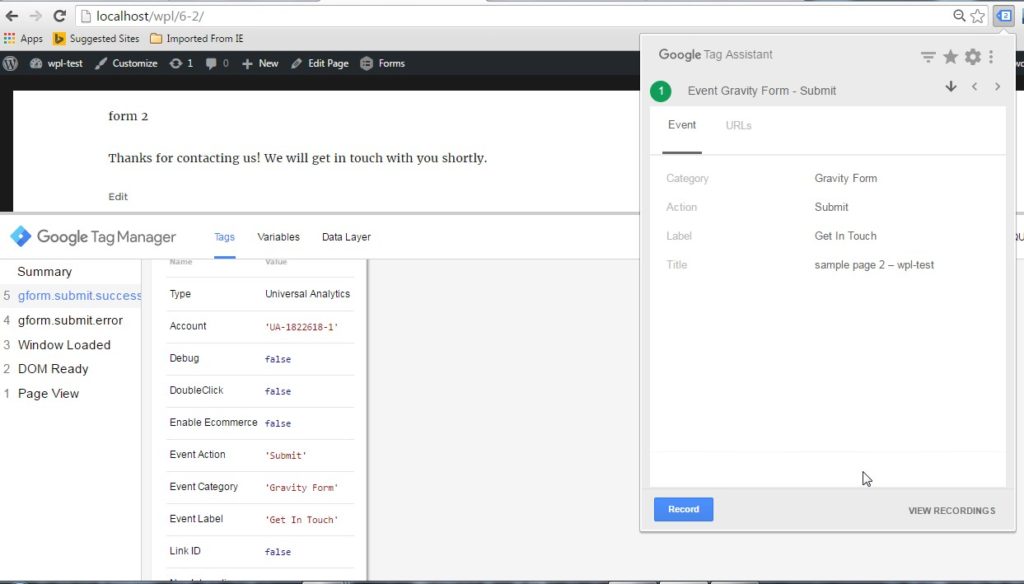
Result:
Likewise you can add Conversion Tracking Code and Change Conversion Label by using Lookup table Variable
Note: As I have tested, this code is working fine in almost all cases. Still you can modify the custom code, if it is not matching your requirement.
You can go for some of other my blogs, which might be useful for you. Also I would love to hear from you about some suggestions and help . You can contact me via contact us form or use blog comment form.
Pingback:Contact Form 7 Event Tracking Via GTM | Notes on Click
can you not get the contents of what was filled into the form fields?
Of course we can fetch value from form fields. But I would suggest not to do that, because that may lead to Google Analytics account suspension. Kindly go through google analytics privacy policies to know more.
YOU ARE THE BEST – spent many hours trying to get GTM/GA to stop counting false positives for gravity forms – this worked AND I don’t have to create a form submission tag for every single form on the site. Thanks for the detailed tutorial.
I am glad that this blog helped you to setup Event Tracking on gravity form. Still working on some other optimal solutions to get it done.
Great! Congratulations. A very elegant solution for GTM. I tried to insert dataLayer.push in the thank you message but the event didn’t activate (I don’t know the reason). Furthermore, with your code it isn’t necessary to insert any code in the site.
I appreciate your sharing this. I especially like how you use the lookup table. Do you know how I can implement this on a confirmation page and not on the confirmation text as the custom code your written watches for? Thank you for sharing your work with the world.
Hi Paul,
if you have different confirmation page then on the basis of URL you can trigger you code. But it won’t work if you have same confirmation page for multiple form, in this scenario you can use page referrer (from which page user is landing to you confirmation page) to trigger your code.
Hope this might be useful.
Thanks this worked perfectly! had wasted hours to find a working solution
There might be issue with Goal Creation in google analytics account. I would suggest just mention category in goal of form tracking.
Hi this isn’t working for me.
I have a Gravity Form with a text confirmation page, not a redirect confirmation. I would like to track this form through Google Tag Manager to display a goal conversion in Google Analytics (Universal Analytics).
I’ve followed all the steps as you have listed above.
No conversions are being recorded. However when using GTM-debug mode, all the triggers are firing, even the gform.submit.success tag is being fired after clicking the submit button.
Could someone please help?
Hi Ariel
As you mentioned above, all the tag and trigger is working fine for you but you are not getting any conversion.
Then I think there might be problem with your GOAL in google analytics, just go thorough goal set up and to confirm that goal is working fine or not check Realtime-> Conversion in google analytics.
if you need more assitance you can leave message in Get in touch form.
Thanks for creating this! It was extremely helpful. I modified the concept to use with another tracking pixel outside of GA that I had inserted as custom HTML in GTM. I just stopped after step 4 and then used the “gform.submit.success” trigger on my tag. I also used the formid variable to narrow down which form needed to count towards the trigger. Thanks again!
Hey Luke, Yes, we can use the same concept for other tracking as well as long as we use the same trigger. I am glad this helped!
Great, works like a charm. But why would you have to create the dataLayer Variable formId, and not use the built-in variable “Form ID”? Or which part of the code would you have to adapt accordingl?
Since in this blog we are using a custom HTML code to check for both non-ajax and ajax form submission, the built-in variable isn’t “Form ID” which is used but as a predefined variable is ssetup by default. .
you are really a good webmaster. The web site loading speed is incredible. It seems that you’re doing any unique trick. Also, The contents are masterpiece. you’ve done a great job on this topic!
Hello,
I just wanted to note that with Gravity Forms v2.2.2 (May 4th Update) the confirmation markup changed, note from changelog;
“Fixed an issue with the confirmation message markup for AJAX enabled forms containing an extra gforms_confirmation_message div.”
Anyway due to this change .gforms_confirmation_message is no longer present in the confirmation markup for AJAX which causes the success to never trigger.
To fix this just remove the s, so it looks for .gform_confirmation_message as that is still present.
Basically, they removed the outer .gforms_confirmation_message div that wrapped the wrapper. Which just leaves the .gform_confirmation_message div.
Hope that helps those who’ve now found this code to no longer function.
All the best,
Cheers
Thanks Garrett, for this information, I will go through this.. hope soon enough, I will come up with some better solution. stay tuned
Hi, thank you very much for this post. I’d been looking for a solution for a while with no luck.
I’m wondering whether it’s possible to set up form error tracking in a similar way?
Thanks so much!
But for some reason this is only working on some of my pages, and not others. I can’t figure out why it only works on some pages, as they all use the same form. Has anyone else encountered this problem? The confirmation message is the same on all pages, yet gform.submit.success only works on certain ones.
Thanks!
Hi Holly,
I would love to help you, before giving any suggestion I wanted to your website so that I can try to figure out what’s going on and why it is not working
Hi and thanks for this useful guide. I managed to follow her even if I’m not very experienced.
I would also like to monitor the errors. Has anyone tried to capture the error label for each field?
How can I proceed?
Thanks in advance for your help